
Resistance spot welding is the fastest, strongest and least expensive method of metal joining. However, although resistance welding has been used in manufacturing for decades, the process is still not well understood outside of the automotive industry.
Resistance welding is unique because it’s a high-speed method of joining metals with a forged weld joint formed through the application of accurately-controlled electric heat and force and without the addition of any filler metal.
The process looks simple, but there are numerous variables at work which must be understood and controlled in order to achieve the desired result – a weld which is stronger than the parent metal. And, by the way, many resistance spot welds are required to be attractive as well as strong, which adds another challenge for welder set-up personnel.
The three main variables that must be considered to achieve success with resistance welding can be remembered as PCT: Pressure (forging force), Current (the amount of welding amps used), and Time (the duration of current flow.)
Without understanding the importance of these variables and their relation to one another, weak and/or ugly welds often result. And, unfortunately, the resistance welding process often gets the blame for these problems, sometimes resulting in changing to a more expensive and slower metal joining method, such as riveting.
A recent visit to a customer’s plant illustrated why weak welds result when the machine is not set up properly. In this case, the welder set-up tech assumed that a long weld time would result in a stronger weld, but we were able to prove otherwise.
Why doesn’t a long-duration weld time produce a better resistance weld? It would seem that “cooking” a resistance weld with extra heat and time would add to its strength. However, just like baking a cake, the right recipe of Pressure, Current and Time is critical to achieving a successful outcome.

UNDERSTANDING A RESISTANCE SPOT WELD
Let’s look at PCT and learn what this recipe means and why just adding more weld time to the process didn’t make our customer’s weld better.
H =I2RT is the actual formula for resistance welding, where H= Heat, I = Current passing through the metal combination, R is the resistance of the metal and contact surfaces and T = Time, or the duration of current flow. This sounds complicated, so let’s go back to PCT, because we must understand those variables to truly understand resistance welding and how it works.
Pressure is measured in pounds of force applied to the weld zone and Current is measured in secondary welding amps. The duration of the weld current flow (Time) is measured in cycles, with one cycle being 1/60th of a second.
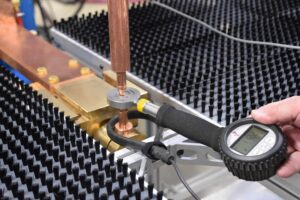
To optimize the process, it is recommended to use high secondary weldng current settings on the machine – typically between 5,000 and 20,000 amps, The welding amps produced by the welder’s transformer are conducted to the work piece through copper arms and welding tips (electrodes) at a very low secondary voltage, typically between three and 12 volts.
As an example, when welding two pieces of 18 gauge low carbon steel, the recommended settings available from one of the readily-available published charts are 660 pounds of pressure, 9,600 secondary amps and eight cycles of weld time. Unfortunately, most resistance welders do not have displays for these variables, so you typically need to use an external weld monitor and force gauge.
The heat required for a spot weld is generated by the resistance to the flow of the current by the material being welded — thus the name resistance welding.
Copper used for spot welder conductors it is considered to have a value of 100% conductivity and common steel has around 10% conductivity, so if we have a given current passing through equal volumes and sectional areas of copper and steel, the resulting heat generated in the steel will be approximately 10 times greater than in the copper.
INTERFACIAL RESISTANCE
All of the resistances in the weld circuit are considered to be in series and the heat generated at any location is proportional to the value of the resistance at that point. We can assume that the faying surface, where the two pieces of steel come into contact, has the highest resistance and will therefore generate the most heat. This interfacial resistance should generate enough heat to bring the faying surfaces to a fusion temperature of approximately 2700-degrees F.

BUT WHAT ABOUT PCT?
If the heat generated at any one spot is proportional to the value of the resistance at that point, how can we control the resistance?
In an electrical circuit, pressing contacting surfaces together with high force reduces resistance, which, in turn, reduces heat generation. In other words, varying pressure (P) can raise or lower the resistance, which has a lot to do with determining the heat in our weld joint.
“C” in the recipe stands for Current, or the amount of amps being passed through the work piece, and that can be adjusted using the transformer’s tap switch, if equipped, and the Percent Current Heat Control adjustment on the welder’s electronic control.
“T” stands for the amount of Time we allow the welding current to flow through the joint. Weld time is important because too little current-flow time will result in a weak weld and too much weld time allows the heat affected zone to grow too large, which weakens the joint and produces a big, ugly indentation.
As you can see by now, Pressure, Time and Current are all ingredients in our resistance welding recipe and each variable must be understood and properly controlled in order to achieve consistent results.
CURRENT DOES THE WORK
By passing through the resistance of the weld zone, electrical current performs the task of creating the required heat. Pure and simple, current is the variable that brings the metal to the 2700-degrees F temperature and causes the metal to become “plastic” and ready for fusion. Pressure on the weld joint forges the plastic metal together and the molecules then fuse together to form the weld nugget.
Think of an overly-long weld time with too little current this way — no matter how long you leave a pan of water on the eye of the stove, you cannot make the water boil without sufficient heat.
And to continue our cooking analogy, think about making biscuits: To end up with consistent, delicious biscuits, we must follow a recipe which calls for carefully-measured ingredients baked for a certain length of time.
Resistance welding is basically the same and for best results, we should follow a recommended schedule that specifies the proper amount of PCT – Pressure, Current and Time.
The American Welding Society (AWS) and other sources publish recommended settings for most metals commonly joined by resistance welding. These charts are your “recipe book” and they list proven settings for various metal thicknesses.
WHY NOT USE EXTRA-LONG WELD TIMES?
Long weld times are often used when trying to correct a problem with the weld recipe. If your weld times are too long, your current setting is probably not the correct “portion” according to the recipe to melt the metal you’re welding.
On the other hand, too much current or not enough pressure may cause your weld to “boil over” – what’s commonly called weld expulsion.
If you have too much weld pressure set on your machine, which lowers resistance, or an improperly-low current setting, the heat level required to melt the metal may never be attained. As you try to overcome this by adding more weld time, you still may never bring the metal to a molten state.

CONSISTENT, HIGH-QUALITY RESISTANCE SPOT WELDS
The key to consistent, high-quality resistance spot welds is understanding all the variables at work (PCT) and getting them properly adjusted and well controlled during the production run.
Although sometimes considered a “black art,” resistance welding is a science that can be understood and mastered with a little knowledge.
We recommend attending a resistance welding seminar or seeking out a mentor with the expertise required. In addition, books and training materials are available through the American Welding Society (AWS) and other sources.
THE REST OF THE STORY
Getting back to our customer who thought an extremely-long weld time was the answer to producing strong spot welds, we were able to prove through destructive testing that only eight cycles of weld time produced a much stronger joint than the 73 cycles of weld time (well over a second) being used prior to our arrival.
In fact, whereas the over-welded assembly broke apart easily when hammered, our properly-welded part never did break despite the operator’s best efforts to prove us wrong.
A “no extra charge” added benefit of a such a short weld time is that his production rates improved dramatically and we left him happy with the resistance welding process.
This article was originally published in Metalforming Magazine, March 2017


